

Peyote stitch is another one of those beadweaving stitches you see everywhere. It's got a fancy name and seems kinda daunting. The good news? It's really, really simple. And once you get the concepts you can create all sorts of things, like tubes and flat circles and sculptural geometric shapes.
This tutorial is for the most basic, flat, rectangular peyote stitch: but even with this stitch you can create all sorts of awesome designs. (Peyote: Advanced tutorial forthcoming).
You will need:
Beads (I usually use size 11 seed beads but I'm using size 8s in the tutorial)
Thread
A Needle
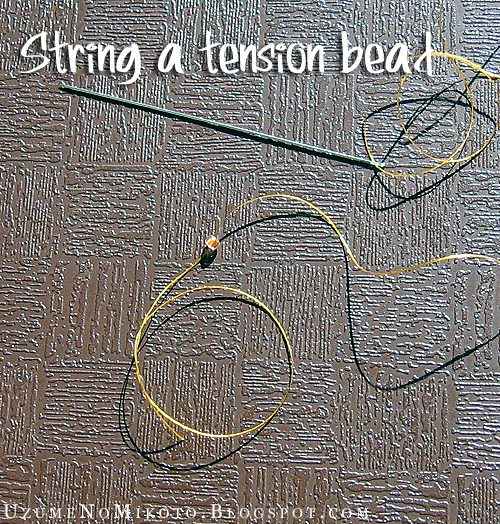
To start, string a tension bead and pass your needle through it again to make it stay on the thread.
Now string an even number of beads. These guys will make up your first two rows.

String another bead: this bead will be the first bead in the third row. That sounds weird, I know-- we've only done one row so far, right?- but trust me.

Here's where the beadweaving actually starts. With the needle facing the tension bead, pass through the third bead from the end (not the new 3rd row bead, not the one before it, but the one before that).

Pull the string taut. The last two beads should be sitting one on top of the other.

String another bead (the second bead in the third row).

Skip the next bead after the one you already passed through; pass your needle through the one after that.

Repeat that pattern (add a 3rd row bead, skip one 1st/2nd row bead, pass your needle through the next 1st/2nd row bead) until you reach the end of your strung beads.

If you take a look now, you can see what I mean about three rows. They each have five beads in them, though your work will be about ten beads's width.
OK, let's start row 4!
String another bead.

With your needle pointing back across your work (away from the tension bead) bring your needle through the last row 3 bead that you added.

Pull the string taut. Your new bead should be sitting right on top of the very first bead you strung, which is the first bead of row 2.

Add another bead, skip the next row 2 bead, and pass your needle through the next bead in row 3.

You get the idea, right? You build the even rows on top of previous even rows, and the odd rows on top of previous odd rows.This is row 4, so you add a bead, ignore the row 2 bead that goes beneath it, and pass your needle through the next row 3 bead that you come to.
Keep adding beads on until you've reached the end of your work.

Once you're done with that row, you can continue adding new rows-- start them just the same way as you started row 4. Add a new bead, ignore the bead that your thread is coming out of, and pass your needle through the one after that. Each mid-row bead is added the same way as each other mid-row bead- string 1, skip one, pass through the next.
In the following image, I've added three more rows onto the tutorial so far. I think that's a decent size for a seed bead swatch, don't you?

Here's the path your thread will take through a peyote stitch swatch:

As you can see, it's all just up-down-up-down-up-down (unlike the crazy counterclockwise-switch-clockwise of Right Angle Weave).
Peyote stitch is a simple stitch, but be aware of the challenge of tension. Try to hold as much of your work between forefinger and thumb as you can, to minimize new beads messing with the tension of previous ones. Also, pull the thread in the direction you're working, rather than upwards or at right angles to your project. Very few beadweavers get tension right the first couple of times, so if you're feeling frustrated, remember that you're not alone.
So you get an idea of the versatility of peyote stitch, I present a gallery of variations:

Practice rectangular 2-D peyote first, and once you've got that down, moving on to sculptural or tubular will be a cinch!
I have always wanted a decent tutorial for Peyote, thank you very much.
ReplyDeleteThank you! I'm glad you found it helpful!
ReplyDeleteGreat tutorial! Looking forward to the next installment :)
ReplyDeletevery nice tutorial...i like its colors...
ReplyDeleteI actually find the tubular peyote easier than the flat one, as the tension can be controlled very easily
ReplyDeleteOh, wow, thanks for the comments, everyone! :D
ReplyDeleteDivya N: I agree, if you can remember to step up... which isn't always the easiest thing for me. XD I love the possibilities inherent in tubular, though, particularly the incredible spirals I've seen some people make.
You explained this so well - I'm going to give it a try! Thank you!
ReplyDeleteThis is so pretty and very well explained, as all the previous commenters have mentioned! :) Thanks!!
ReplyDeletewoah, I've learned this in the age of 8 in the afternoons after school when I was in a kindergarten for 1st - 4 grader pupils. I didn't even know the name then. We got plastic beads for practise.
ReplyDeleteThanks for the tutorial anyway. :-)
THANKS FOR EXPLAINING THE STEP BY STEP PROCESS OF PEYOTE BEADING TO A NEWBIE. I HAVE BEEN PUTTING OFF TRYING SOME PEYOTE BEAD PATTERNS BECAUSE I WASNT SURE WHAT IT MEANT...NOW I DO THANK SO MUCH.
ReplyDeleteluv to this peyote technique
ReplyDeleteNow, on to the next installment, please.
ReplyDeleteHi, Uzume!
ReplyDeleteMy name is Kelly and I'm the editor of AllFreeJewelryMaking.com (formerly AllFreeBeadedJewelry.com), a resource site for free DIY jewelry tutorials, tips, and techniques. You may recall us reaching out to you previously regarding linking to your free jewelry tutorial(s) on our website, but I don't believe we ever heard back from you.
Here's the link to the project reviews we posted to refresh your memory:
http://www.allfreejewelrymaking.com/?task=search&search_term=uzume
I just wanted to reach out again to confirm whether or not we have permission to link to your tutorials in this manner. As you can see, you of course receive full credit for the project and we simply provide a link directing our readers back to the tutorial on your blog. It's great free exposure for your site; hopefully you've seen some traffic from us!
Please let me know if we can link in this manner, and I'll be happy to link to more of your tutorials.
Thanks so much for your time!
Best,
Kelly
--
Kelly Spence, Editor
www.AllFreeJewelryMaking.com
Prime Publishing LLC
Become a fan: www.facebook.com/AllFreeJewelryMaking
Follow us on Twitter: www.twitter.com/AFJewelryMaking
Follow us on Pinterest: www.pinterest.com/AFJewelryMaking
Lay out is very easy to follow.
ReplyDeletethanks
Bonnie
Well Uzume, I am here thanks to AllFreeJewelry, so I can say this kind of link is really good for me ;)
ReplyDeleteThis is perfect instruction thank you.
ReplyDeleteThis comment has been removed by the author.
ReplyDeleteI am a newbee at this. I have made many leather items for my wife & daughter. Also many of my own Mountain Man Bowie Knife sheaths, bags, necklaces, etc... I have always wanted to embellish my knife sheaths with bead work like the Native Americans did. Just a few quick questions: the anchor bead, what holds it in place ? When I make a swatch or long strip for my Bowie Knife Sheath how do I attach it ? Glue, stitching, or ? Thanks for your help. This is going to look great!
ReplyDeleteIm starting tonite
ReplyDeleteso simple thank u gona me it
ReplyDeleteim so glad i ran into this through your website i always thought i couldnt do peyote but with your tutorial i can i saved it to my pinterest page thank you sooooooooo much i cant wait to get started on my first bracelet peyote style
ReplyDeleteHi is this and even or odd peyote how do work out wide I need to make bracelet please. Thanks
ReplyDelete