The variations are infinite, once you understand the underlying concepts, so it's a good project to have under your belt if you like paper crafting. I use my ningyo (doll/s: literally "person shape") for art, but they can also be used for crafts like cards and bookmarks. They are just so cute!
First, a note on terminology. For one thing, as most of you probably know already, Japanese language usually doesn't use pluralization markers. So multiple kimono are called kimono, multiple pieces of sushi are called sushi, et cetera. Multiple ningyo? Ningyo (人形). Technically, ningyo has a long o at the end and should be written ningyou if you're not using diacritical markings, but that's neither here nor there as far as the tutorial goes. I like just writing 'ningyo', and that's what I shall do!
Kimono (literally "worn thing", written 着物) are an ancient form of Japanese clothes. At their most basic, kimono consist of a shapeless robe with sewn-on sleeves (the kimono) which is wrapped around the body and tied with a belt (the obi, written 帯). The belt is (almost) always tied in the back and is often knotted into elaborate bows. Both men and women wore kimono, but they have fallen out of fashion. However, they are still worn for special occasions, like weddings, summer festivals, and coming-of-age ceremonies. It is also not uncommon to see older women in kimono on a day-to-day basis.
There is a lot of history in this simple garment, and there are a lot of rules/guidelines. For example, younger women usually wear brighter colors. So if you're designing your ningyo to be a little girl? Use reds, yellows, pinks, and vibrant, summery colors. If you would like her to look older and more refined, use paler, more subdued colors. Also, the younger a woman is, the higher up she ties her obi (at least typically).
Another rule: kimono lapels need to cross left over right. Always. The only time you dress someone so the lapels are crossed right to left is if you're dressing them for their own funeral! So be careful!
OK. On to the tutorial!
You will need:
Paper. I use small square paper, but you can use any kind as long as it's cut into appropriate dimensions. If you're using origami paper, you need three pieces: one for the kimono, one for the sleeves, and one for the obi (belt).
Cardstock, thin white cardboard, or the like (for the head and neck).
Scissors
Glue or paste
Black crepe paper or thick ningyo-hair crepe (available at Japanese stores where you can buy origami paper)
Cut the cardstock into a neck and (at least kind of circular) head, as you can see in the picture below.
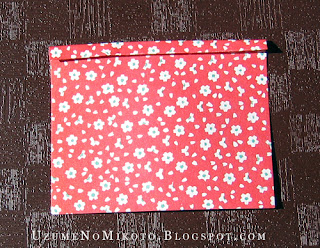
OK, start by taking one of the 'kimono' squares and setting it face down. Fold the top of it down, and glue it. There's no precise formula for how to do this, but take a look at the picture and you'll get the idea.
Once the glue is dry, turn the paper over, and fold the top down again (about halfway as far as the first fold) to create the kimono's lapel.
Turn the paper white-side up, and glue the neck down. It should be a little off-center, as we're going to cut off some of the paper in the next step.
Cut a strip of the paper off the left side, just to make folding a little easier. Again, no precise formula-- just look at the picture. It's not a big deal exactly how much you cut off.
Set the small cut-off piece aside-- we won't be needing it.
OK, now we start folding the kimono! First, fold the left side down across the neck to create half of the lapel, but don't crease it all the way! Only crease it for about 1/3 of the way down.
Now, you have to make a slightly tricky origami fold to create the shoulder/chest.
The (Not-So) Tricky Fold:
Step 1: Turn the model and hold as so, holding the creased part of the fold that you made in the previous step.
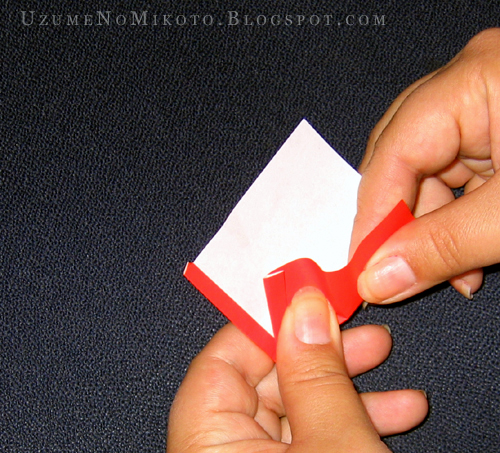
Step 2: Grab hold of the kimono skirt (the lower 2/3rds or so of the paper) with your thumb (outside the paper) and forefinger (inside the fold you just made).
As so:
Step 3: Push your thumb and forefinger (that are holding the flap of paper) towards your other hand (while still holding onto the flap). Make sure that your other thumb is firmly holding the lapel down. A crease will begin to form.
Step 4: Press the paper down, and crease the fold that you have just made. As you can see, the 'skirt' part of the kimono is on top of the 'lapel' part.
The completed fold. As you can see, the bottom edge of the skirt is lying (pretty much) even with the bottom line of the entire piece of paper.
Here's what the fold looks like from the side, if you open it up.
End of Tricky Fold instructions!
Back to the ningyo! OK, so you've managed the 'tricky fold' and created the left half of the kimono. Awesome! As you can see, that fold created the doll's shoulder/torso area, giving her upper body a shape.
Now, create the right side of the kimono by doing the 'tricky fold' again, this time on the right. You use the exact same steps: fold the lapel down, hold it down, fold the skirt so it creates a rectangle that protrudes over the doll's upper body and lapel area. Go ahead and trim the right lapel if it's extending over the left edge of the doll.
You're done with the serious folding: all that's left is assembly.
We need to make an obi to hold the ningyo's kimono closed, so take the piece of paper you chose for the obi and cut it in half.
We'll only be needing one of them, so set the other aside for another project.
To make the obi smaller and more substantial, I turn it over and make a couple of folds. First, I fold the top down a little more than halfway. I then glue it.
Now we need to put the obi on the ningyo. Turn the ningyo face down (the obi should have the side with the folds still facing up) and glue her down in the center of the obi.
Fold both sides of the obi over the back of the doll, and glue them down.
Turn her over, and you can really see how your ningyo is coming together!
Now she needs a head. Working with the crepe can be a little tricky, so, if you're just starting, you can use black (or any other hair-colored) paper instead.
Glue the crepe to the top part of the head. I suggest only letting a little bit of the face show.
Turn the head over, and fold the sides of the crepe across the back of the head. Glue them down, too.
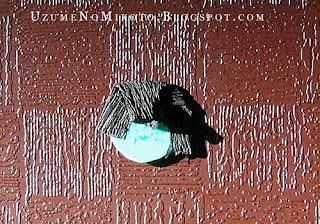
Turn the head over. Unless you're really into the flattop look, you're going to have to give the top of her head a more rounded curve, right?
This fold can be a little tricky, too. Fortunately, as long as the front looks good, the back can look as weird as you need it to.
Turn her head over. Twist the part that's sticking up so that the left part is crossed in front of the right part.
Keep twisting a little bit, and push the right part downwards and to the right so that it folds down over the back of her head. Glue it down. Put it under a small pile of books and let the glue set for a while. (That's sort of a joke, but sort of serious. It all depends on how your crepe is behaving.)
The completed head:
Attach the head to the body by gluing it onto the top of the neck.
Cut out a piece of crepe for hair-- it can be whatever shape you want it to be, and however long you want it to be.
Glue the hair onto the back of her head.
In some cases, this would be sufficient for a ningyo. A lot of traditional ningyo don't have arms. She's still pretty cute without them, isn't she? However, if you do want arms, here's one way to make them.
Find another sheet of paper the same size, color, and pattern as the one you made the kimono out of.
Fold it in half and glue it.
Cut it in half to create two squares.
Stack the squares one on top of the other.
Holding the squares together, cut out a sleeve shape.
Don't forget to curve the front corners!
Glue the sleeves to the back of the kimono (between the kimono back and the doll's hair) and you're done!
Now that you understand the basics, you can change things up a LOT. You can change the hairstyle, the sleeve shape, and the colors and patterns you use. You can also make a two-sided doll if you fold up an obi knot.
There are many different obi knots (musubi), quite a few of which are asymmetrical, like the one below:
Have fun! I'd love to see what you make!
Here are some kimono resources (I find it really helps me to have kimono pictures for reference):
A Google image search for 'kimono' in Japanese.
The Wikipedia "Kimono" entry (in English).
HanamiWeb's Kimono page (in English.)
A Google image search for "Beautiful Kimono" (a magazine) in Japanese.
A Google image search for "Shichi-go-san Kimono" in Japanese: lots of images of (adorable!) small kids in kimono.
And, not a kimono resource per se, but if you're interested in Japanese stuff you might enjoy my Japan blog.


me encantan estas muñecas, gracias por compartir este tutorial
ReplyDeleteOh my goodness, once again, your amazingly easily understandable tutorials and artistic skills have managed to intrigue me!! Wow! Thank you for this post, I will definitely try this out!!
ReplyDelete-The Creative Muslimah
Thanks! I'm glad you enjoyed the tutorial. :)
ReplyDeleteI just found your wonderful blog. Interested in kind of crafts, I was of course amazed by your skills and ideas! I once got such a paper doll from a Japanese girl and was intrigued by the simple loveliness. Thanks for sharing this with us! Doris (Switzerland) and Babelina & Button
ReplyDeleteBeautiful....I just followed your directions and made one for my little granddaughter who is visiting and missing her dolly that she left at home! Thanks and hugs!
ReplyDeleteHi Uzumi, thank you very much for your post, it is wonderful and very useful.
ReplyDeleteI loved it!
I love this. Have to go make some right now! Thanks.
ReplyDeleteVery nice I've already made 3 for my daughter's class for they are learning about Japan. Thank you so much!
ReplyDeletevery very nice and very fun!
ReplyDelete👏🏻 thank
ReplyDelete