

Recently I posted pictures of some of my Right Angle Weave (RAW) projects, and that got me thinking. RAW is such a funky stitch, and it can be hard to get the hang of. A tutorial with a bunch of pictures might help.
So I've made one!
Let's start with the basics. RAW is an off-loom beadweaving technique. It requires string, a needle, and some beads. Practically any kind of beads will work. I usually use size 11 seed beads, but the tutorial uses 8s. I switch colors often to make the tutorial a little easier to understand, but I usually just use one color overall.
RAW creates a bunch of little boxes (or ovals, depending on bead sizes and tension) that are connected together. An important feature are the little empty diamonds created where 4 boxes meet. These diamonds can tell you if you are weaving correctly: if you are, there will never be any thread crossing the diamonds, either horizontally or vertically. Keep an eye on that!
Oh, also, if I seem a little math-inclined or a little tutor-y, it's because I am. :)
On with the tutorial!
First, string a tension bead. Basically, put a bead on the string and then run your needle through it again (from the bottom up) so that any beads you string won't fall off. Leave a long enough tail for you to weave in-- at least a couple of inches.

Box 1
String twelve beads. You're going to be making boxes that have 4 sides with three beads on each side-- the number twelve should make sense. If you want 4 beads per side, string 16. If you want 2 per side, string 8. You can even make boxes that use just one bead for each side, and then you'd string 4. But I'm going to be working with 12.

You're all set and ready to get weaving. Make a loop by putting your needle through the first six beads you strung.

You're done with your first box!

Box 2
To start the second one, string 9 more beads. Each group of three will create one of the sides of the box-- the last side will be the three beads on the leftmost part of the first box.

Once you've strung your beads, you need to make them into a loop. Do so by passing through the leftmost three beads of the first box.

So you have a box. What do you do now? Well, if this is RAW (and it is) this means that you need to take your needle through a couple of sides of the box you just made.
Go through the bottom three, leftwards.

Go through the next three, upwards.
.jpg)
A lot of passing back through already strung beads, right? Well, that's just the magic of RAW. It creates a strong and supple weave. And, trust me, it gets easier the more you do it.
Box 3
Add on 9 more beads.

Take the needle upwards through the three beads on the left of the second box.

Now, as previously stated, with RAW, you gotta re-go-through the beads in the loop you just made.
So go through the three beads on the top, in a leftwards direction,

And the three beads on the left, in a downwards direction.

You may be seeing at least a little of the looping pattern by now. The instructions can seem random, but there is a pattern. Clockwise for one box, counterclockwise for the next. Lots of loops.
Box 4
OK, so try to figure out how to put the fourth box on yourself. It's similar to the second one, and you need to end with the string going upwards.

I'm going to stop here on the first row, and build up the second row now.
If you do want to continue the first row on, just keep repeating the way we put on boxes two and three over and over again. At the very end of the row, make sure you turn your work so that the needle is coming up through the top left.
If you do want to continue the first row on, just keep repeating the way we put on boxes two and three over and over again. At the very end of the row, make sure you turn your work so that the needle is coming up through the top left.
Box 5 (Row 2, Box 1)
The first step in building the second row is to pass through the top three beads of the box you're working with. Pass through them in a rightwards direction.

Any guesses on how many beads we'll need for the first box on the top row? We've got a side already, so we only need to put on three more sides-- so we need to string 9 beads.

Go back through the top of the fourth box, again in a rightwards direction.

And go through the rightmost three of the new box, in an upwards direction.

Box 6
This one is more interesting: how many beads do we have to add now? We have two sides already, so we need to add 6 beads.
Pass through the top three of the third box (purple, in this case)

And pass upwards through the leftmost three beads in the fifth box (yellow, in this case).

Now you have to go through the top three beads of box 6, in a rightwards direction,

And the right three beads in a downwards direction.

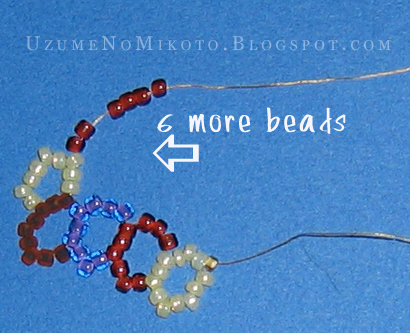
Box 7:
This box starts in a different way: without adding any new beads on yet. You start it by passing through the top three beads of the second box, in a rightwards direction.

NOW is when you add your 6 beads.

Pass down through the rightmost three beads of box 6,

And over through the top three beads of box 2 (again), also in a rightwards direction.

Lastly, go up through the rightmost three beads of box 7.

Box 8:
I don't really need to tell you how to make box 8, do I? Work it just like box 6.

And you're done! At least with this little swatch.

You can make RAW as long (by repeating the procedures for boxes 2 & 3 and 6 & 7) or as tall as you want. If you want to add another row on top of this one, string 9 more beads and work in a counterclockwise direction above box 8.
You can also increase and decrease the number of boxes per row, or even turn RAW into 3D cubes. This really is a very versatile stitch, and this tutorial just gives you the basics. But hopefully it helped. :)
Notes:
Here's the path that the thread takes through RAW.

Interesting, isn't it? You start counterclockwise, make a full loop and a half, then switch to clockwise for another loop and a half, ad infinitum.
And here's a very important point, that I mentioned in the introduction:

These diamonds will let you know if you're weaving correctly. They should never have thread crossing them horizontally or vertically.
Here are some examples of other RAW things:

As well as a few of my blog posts that feature RAW bracelets: the Spring Blossom Bracelet, the Simple Pink Bracelet, and the Yggdrasil Blossom Bracelet.
And there you go. I welcome comments, suggestions, complements. :)
welcome blogging...This is smart tutorial...keep it up...
ReplyDeleteThanks! :D
ReplyDeleteVery cool, thanks for sharing .
ReplyDeletethis is a very thorough tutorial..i feel like i can actually do it! thankyou so much for taking the time to do it!
ReplyDeleteIt's awesome really! :-)
Your tutorials are great, thank you so much! You are so awesome, not only can you create such beauty, but, you can teach! That is a rare combination, again, thank you!
ReplyDeleteBedankt voor al je duidelijke tutorials...
ReplyDeleteGerda